Crowd-Pleasing Best Recipe for Strawberry Cheesecake — Better Than a Restaurant
This luxuriously creamy and velvety-smooth Best Recipe for Strawberry Cheesecake is trending for a reason — it is loaded with wholesome, budget-friendly pantry ingredients, ready in one simple cooking session, and delivers deeply satisfying and packed with bold, layered flavor that keeps everyone coming back for seconds. It is stress-free to make any night of the week, completely beginner-friendly with zero cooking experience needed, and!
- Category: Dessert Recipes
- Method: Slow Cooker
Ingredients
Let’s take a closer look at what you need to make this recipe (measurements in the printable recipe card at the bottom of the post):
cheesecake graham cracker base
Every cheesecake needs a buttery base that complements, yet doesn’t distract from, the decadent filling. I’ve stuck with Honey Graham crackers to keep the crust delish but neutral so the cheesecake can shine. To make it as simple as processing the crackers into crumbs, then combining them with sugar and butter. You will need:
Graham crackers: 14 whole graham cracker sheets or a scant 2 cups crumbs of your favorite cookies/crackers.
Butter: Salted or unsalted butter will work in the crust.
Sugar: Granulated sugar please.
CHEESECAKE FILLING
The cheesecake filling is incredibly smooth, rich, and creamy. The addition of sour cream and one extra egg yolk makes the filling extra creamy, and the addition of lemon zest adds the perfect pop of sunshine to cut through the richness. And the best part – making the filling is the easiest part of the entire recipe! Here’s what you’ll need:
Cream cheese: I used full-fat cream cheese, but it will also work with less fat. Remember, less fat = less flavor and creaminess. Please do NOT use nonfat cream cheese.
Sour cream: Please use full-fat sour cream at room temperature. It will make your cheesecake luxuriously creamy and prevent it from drying out.
Sugar: Granulated sugar will sweeten the cheesecake filling while allowing the lemon flavor to shine.
Eggs: Use four large eggs and one large egg yolk (so you will need a total of five eggs). The eggs bind the cheesecake together, and the extra yolk makes it extra creamy. Take care that your eggs are at room temperature.
Lemon zest: The zest of one lemon adds a pop of citrus to cut through the richness. Lemon zest is the bright yellow outer layer of the lemon peel. Use a microplane or a box grater for grating. Make sure to stop grating at the yellow part, as the white underpart (pith) is extremely bitter.
Vanilla extract: Use quality extract for best results.
STRAWBERRY TOPPING FOR CHEESECAKE
Most cheesecake recipes don’t use enough strawberries, which always leaves you wanting more! Instead, this Strawberry Cheesecake is brimming with fresh strawberries coated in an irresistible, sweet, fresh strawberry glaze. This strawberry topping combines fresh strawberries with a hint of strawberry Jell-O to enhance the fresh strawberry flavor while maintaining a natural, fresh taste. It also rewards you with a glaze that isn’t runny or stiff, but just thick enough to coat the strawberries. You will need:
Fresh strawberries: 2 pounds of fresh, ripe strawberries. It may seem like a lot, but the ratio is perfect for the rich and creamy filling.
Sugar: Use granulated sugar to make the syrup-like coating.
Jell-O: Strawberry Jell-O adds sweet strawberry flavor, but will not make the texture thick and Jell-O-like. Please don’t omit this ingredient, or the water/sugar/cornstarch ratios will be off.
Cornstarch: Thickens the strawberry glaze.
Lemon juice: Brightens the glaze and enhances the strawberry flavor. Fresh or bottled is fine.
WHIPPED CREAM
You don’t have to add whipped cream to the Strawberry Cheesecake, but I love the ethereal lightness it brings. You can use stabilized whipped cream (so it can be added ahead of time) or just plain whipped cream with the same ingredients, but omit the unflavored gelatin and water.
So, what is this magical stabilized whipped cream? If you make traditional whipped cream and pipe it onto the cheesecake, it will deflate, or even worse, it will be weeping within the hour. Stabilized whipped cream, however, will hold its shape long after the last bite of cheesecake is gone (it holds indefinitely).
Stabilized whipped cream is made gelatin in water then whipping it into the heavy cream to give it structure but it doesn’t alter the flavor. To use this stabilized whipped cream, pipe it onto the cooled cheesecake any time and either serve or pop it back in the refrigerator, avoiding any last minute stress.
What Pans do I Need for Cheesecake?
Springform pan:You will need one 9-inch springform pan; alternatively, a 10-inch springform pan can be used, but be prepared to reduce the baking time. A springform pan is tall enough to hold the cheesecake, and most importantly, it springs open, allowing the outside of the pan to be removed. This will enable you to remove the cheesecake and slice it easily.
Roasting pan: Place the springform pan inside the roasting pan, then pour water around the cheesecake to create a water bath. This prevents the cheesecake from cracking (more on the science below).
What if I don’t have a largeroasting pan? You can purchase a large, disposable foil pan from the grocery store for around a dollar if you don’t have a roasting pan. I suggest double-stacking two pans because they are quite flimsy and can buckle under the pressure of the water. Take care to use oven mitts and two hands when removing the pans from the oven so you don’t lose your cheesecake!
Cheesecake (Strawberry) Variations
I don’t recommend straying from the cheesecake recipe as baking is science and can go wrong very quickly, but you can make adjustments to the crust or strawberry topping. Here are a few ideas:
Swap crust: You may substitute the Graham cracker crust with your favorite cookie, such as shortbread, vanilla wafers, or vanilla Oreos. If using shortbread cookies or vanilla wafer cookies, combine them with the sugar and butter according to the recipe
Instructions
. If using vanilla Oreos, combine them with sugar, but reduce the butter to 4 tablespoons, as the Oreo filling creates a similar binding effect.
Make it gluten-free: Use your favorite gluten-free cookie such as gluten-free Graham crackers.
Add blueberries or raspberries: Swap some of the strawberries for an equal amount ofblueberries or raspberries.
Berry swirl: Pour half of the cheesecake filling onto the crust. Drizzle strawberry jam over the top, then top with remaining cheesecake filling, followed of raspberry sauce. Use a toothpick or a knife to swirl everything together gently.
Lemon curd whipped cream: Use the lemon curd whipped cream found in my strawberry shortcakes in place of the whipped cream for a tangier version.
Mint: Garnish the cheesecake with fresh mint leaves.
WHAT IS A WATER BATH AND WHY IS IT IMPORTANT WHEN BAKING A CHEESECAKE?
A water bath may sound exotic but it simply means baking the cheesecake in springform pan set in a larger roasting pan surrounded . Cheesecakes require a water bath so the cheesecake doesn’t crack. Here’s how it works:
1. The water bath helps the cheesecake bake evenly. The hot water insulates the outer edges of the cheesecake so the edges don’t bake more quickly than the middle. This ensures even baking throughout and lessens the likelihood of the cheesecake cracking, sinking, puffing up, darkening or curdling.
2. A water bath creates a moist environment. This is important because cheesecakes are egg-heavy. Eggs need steam caused environment to properly rise and avoid drying out or burning, which again causes cracking.
HOW TO WATER PROOF CHEESECAKE SO IT DOESN’T LEAK!
The springform pan needs to be waterproofed so water from the water bath doesn’t seep through the bottom of the springform pan and soak into the cheesecake. Just surrounding the pan with foil, however, is not foolproof. If you use my two-step waterproofing technique, however, I guarantee you won’t have any leaks!
WATERPROOFING STEP 1: Place 2 large 18″ x 18″ pieces of aluminum foil on a flat surface underneath the pan in the form of a “+.” Gently fold (to make sure you don’t create any holes) up the sides of the foil around the pan. If you use a slow cooker liner (below), you can use regular foil instead of 18-inch.
WATERPROOFING STEP 2 (optional but HIGHLY recommended): Place the foil-lined springform pan in the center of a slow cooker liner or large oven roasting bag. Bring the liner up to the top of the pan, then gather the excess and tie it in a knot on one side.
If you combine these two steps, your Strawberry Cheesecake will be 100% leak proof – winning! If you don’t add the liner in step 2, then I suggest 2 more layers of foil around your springform pan.
HOW TO MAKE STRAWBERRY CHEESECAKE
Let’s take a closer look at how to make this recipe, complete with step-by-step photos (the full recipe is available in the printable recipe card at the bottom of the post). There are quite a few steps, but each one is simple, and you can make them at different stages/parts of the day(s) if you wish:
STEP 1: HOW TO MAKE THE CRUST
Grind Graham crackers: First, you’ll want to make crumbs the Graham crackers in your food processor or crushing in a sealable bag with a rolling pin/side of a can. You want very finely ground crumbs because they stick together better.
Combine crumbs, sugar and butter: If you use your food processor, simply add the sugar and butter directly to the processor and process until the crumbs are moistened. If you don’t have a food processor, add the crumbs, butter and sugar to a bowl and stir until the crumbs are evenly moistened.
Make the crust: Transfer the moistened crumbs to your lightly greased springform pan and press firmly into the bottom of the pan in an even layer using a small bowl or bottom of a measuring cup. This helps the crust stay intact and not crumble when sliced. But don’t compact the crumbs too much or the crust will crack when you slice the cheesecake.
Bake the crust: Bake the crust at 325 degrees F for 10 minutes then allow it to cool while you make the cheesecake filling. Baking the crust before adding the cheesecake allows it to seal together and cooling the crust before adding the cheesecake prevents it from becoming soggy.
STEP 2: HOW TO MAKE THE CHEESECAKE FILLING
Beat cream cheese and sugar: Making the cheesecake filling is so easy, the mixer literally does all the work! Beat the cream cheese in the bowl of an electric mixer fitted with the paddle attachment for 4 minutes then add the sugar and beat an additional 5 minutes. You don’t want to shortcut the process for the creamiest filling. If you don’t have a stand mixer, than an electric hand mixer will also work.
Add sour cream and lemon zest: Add the sour cream, lemon zest, vanilla, and beat until blended.
Add eggs: Add the eggs one at a time followed yolk, beating as little as possible because overbeating eggs can cause cracks and the cheesecake to deflate.
Assemble the cheesecake: Pour the cheesecake filling onto the cooled crust. Drop the pan on counter a few times to get rid of any air bubbles.
STEP 3: HOW TO MAKE THE WATER BATH
Add cheesecake to roasting pan: Place the waterproofed cheesecake in a roasting pan then place the roasting pan in the oven. I like to place the roasting pan in the oven before adding the water bath or else the pan can become heavy and the water can slosh around and threaten to get in your cheesecake while you transfer it.
Make water bath: To add the water, use a glass liquid measuring cup or pitcher (something with a spout) to carefully pour in enough boiling water around the cheesecake until it reaches halfway up the side of the springform pan. Make sure to add the water slowly to the corner of the pan so none of it gets on your cheesecake.
STEP 4: HOW TO BAKE THE CHEESECAKE
Bake the cheesecake: Bake the cheesecake at 325 degrees F for 70-85 minutes or until edges are firm and the center 2-3 inches of the cheesecake is still wobbly.
HOW TO KNOW WHEN A CHEESECAKE IS DONE
Cheesecake is the creamiest when not overbaked. You don’t want to bake the cheesecake until completely firm in the middle or it will be overcooked it cools, resulting in dry, heavy, far less creamy cheesecake. Instead, bake the cheesecake until the outside is firm and the center of the cheesecake barely jiggles.
What does this look like? Gently shake the cheesecake wearing oven mitts so you don’t burn yourself. If the outside of the cheesecake is firm and only a small 2-3-inch circle in the center jiggles slightly, it’s done. If the jiggling circle is larger than a few inches, then bake on.
The baking time can vary due to the differences in ovens, baking pans, beating times, etc., so make sure to check the cheesecake at 70 minutes then add additional time as needed.
STEP 5: HOW TO COOL THE CHEESECAKE
Cool cheesecake in the oven: Turn off your oven and crack open the oven door. Allow the cheesecake to cool in the oven for 60 minutes.
Cool cheesecake on the counter: Remove the cheesecake from the oven and the water bath and place it on a cooling rack on the counter.
Loosen cheesecake: Run a knife under hot water, wipe it dry, then run it along the edges of the cheesecake to loosen it from the pan. This helps prevent cracking so the cheesecake doesn’t stick to the sides of the pan as it slightly constricts. Unclamp the springform pan.
Cool cheesecake completely: Continue to cool the cheesecake for 2-3 hours on the counter or until the cheesecake is completely cooled.
Refrigerate overnight: Cover the cheesecake with foil or transfer to a cake caddy with a lid and chill in the refrigerator overnight, but best if 24 hours.
STEP 6: how to make strawberry topping for cheesecake
Blend strawberries: Add 1 cup of the least unattractive strawberries to a blender along with a bit of water then puree until smooth.
Thicken puree: Add the puree to a small saucepan along with cornstarch, sugar and a pinch of salt; whisk to dissolve the cornstarch. Cook over medium high heat, stirring constantly, until reduced and thickened to a thick syrupy consistency.
Add Jell-O: Transfer the glaze to a large bowl and stir in strawberry gelatin and lemon juice followed .
Chill: Store in the refrigerator for at least 1 hour or until ready to top the cheesecake. Once cool, adjust thickness to make it the right consistency if needed a tiny touch of water if you would like it thinner.
STEP 7: HOW TO MAKE WHIPPED CREAM
You can make stabilized whipped cream or traditional whipped cream. I am a huge fan of stabilized whipped cream because it means I can make the dessert 100% ahead of time and leftovers stay picture perfect. Making stabilized whipped cream is the same process of traditional whipped cream, just with the easy added steps of dissolving the gelatin in water and microwaving it.
Optional step for stabilized whipped cream: Add unflavored gelatin to a microwave safe bowl then pour the cold water over top; let stand for 5 minutes. Transfer the gelatin mixture to the microwave and microwave for 20 seconds. Stir the mixture, then set aside to cool.
Whip cream to soft peaks: While you’re waiting for the gelatin to cool, you’ll mix heavy cream, sugar and vanilla in a bowl until it thickens and forms soft peaks (the whipped cream folds over when you lift the beaters out of the bowl).
Add gelatin: Once you’ve reached the soft peak stage, you’ll slowly pour the gelatin mixture in as you’re mixing the whipped cream and continue to mix until the whipped cream forms stiff peaks (the whipped cream stands straight up and doesn’t fold over when you lift the beaters out of the bowl).
Add topping: You can pipe the stabilized whipped cream onto the room temperature Strawberry Cheesecake before you pop it into the fridge or any time after that. The beauty of stabilized whipped cream is it will hold its shape indefinitely. If using regular whipped cream, top the cheesecake just before serving.
STEP 8: ASSEMBLE
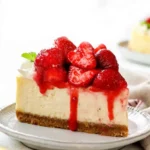
Add strawberries: Pile the strawberries high over the cheesecake, leaving a border for the whipped cream if using (below), or add the whipped cream first and then pile in the strawberries.
Add whipped cream: Pipe the whipped cream around the outer edges of the cheesecake and garnish with mint if desired.
STEP 9: HOW TO SLICE CHEESECAKE
Use a hot knife: Using a hot knife is crucial for clean cuts as the hot knife glides right through the cheesecake. Fill a large glass with hot water, then dip the knife in the hot water before each cut. Wipe knife clean with a paper towel after each cut, then repeat.
DEVOUR!